Opel Kadett GSi Group A Rally Replica
Moderators: daewoomofo, Moderators Group
Opel Kadett GSi Group A Rally Replica
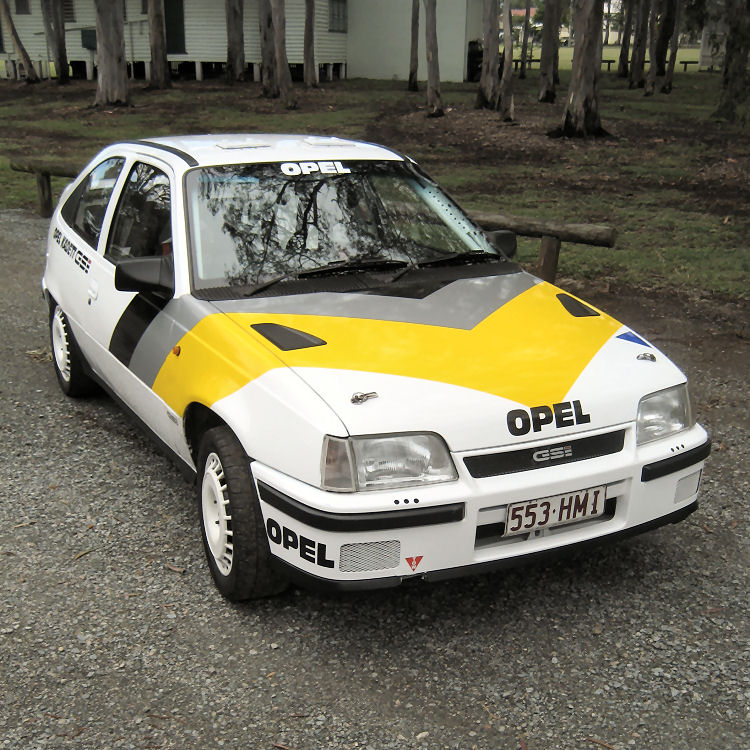
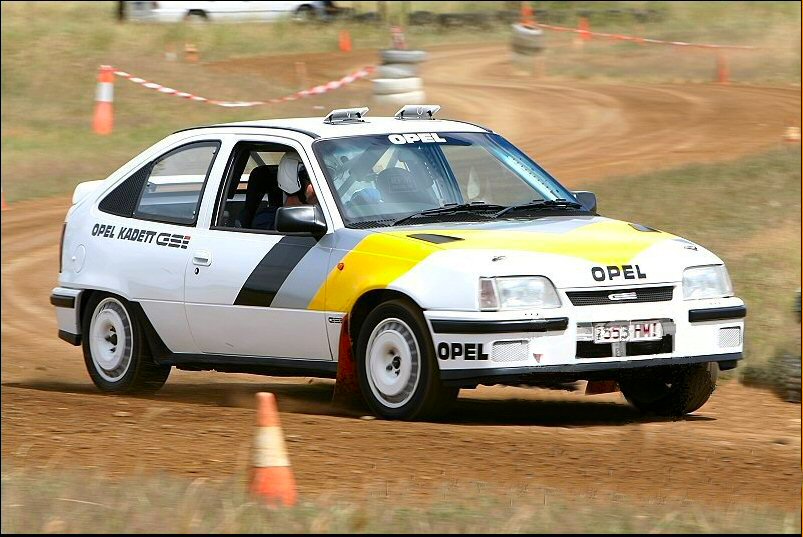
1984 Opel Kadett GSi Works Rally Cars where homoligated 1st November 1984 for Group A as a Opel Kadett-E-GSi (Homologation A-5242).
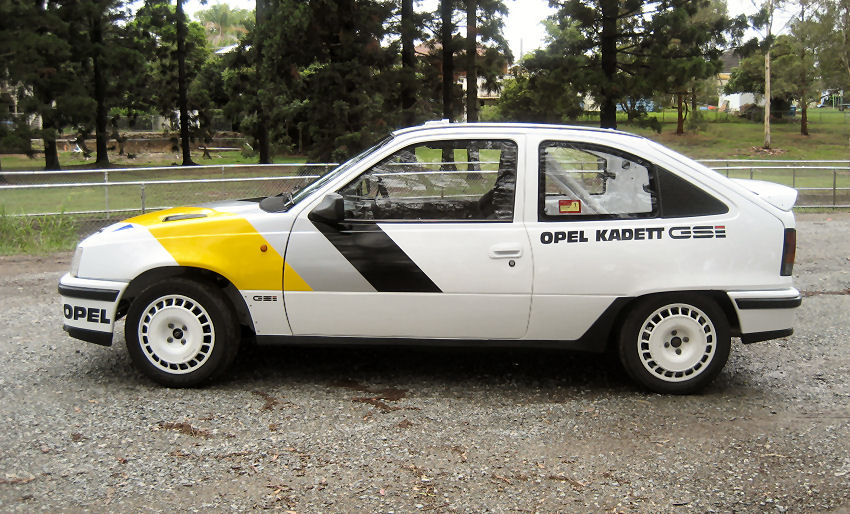
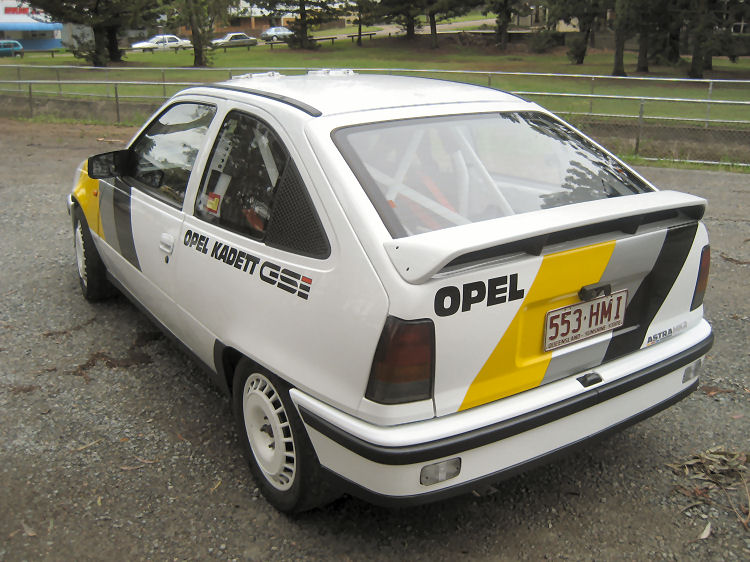
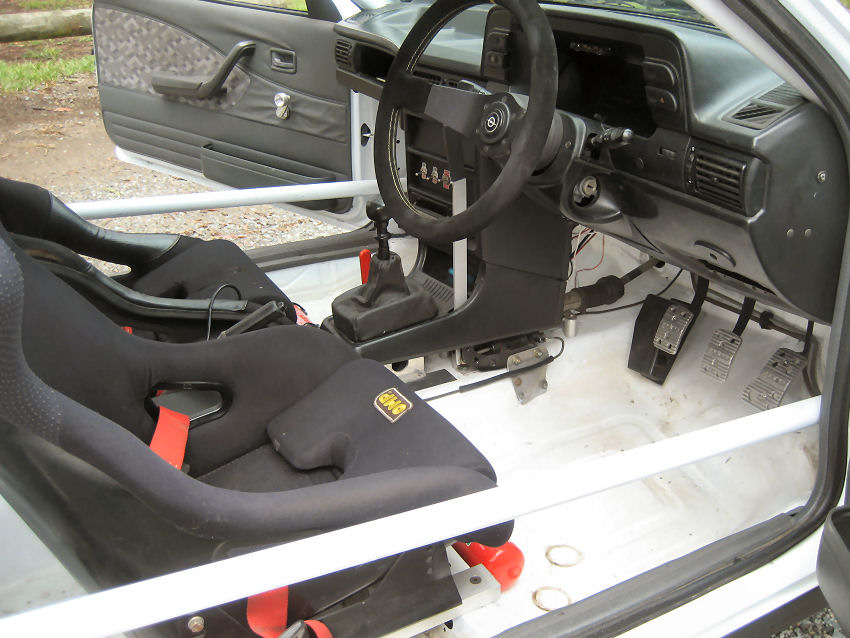
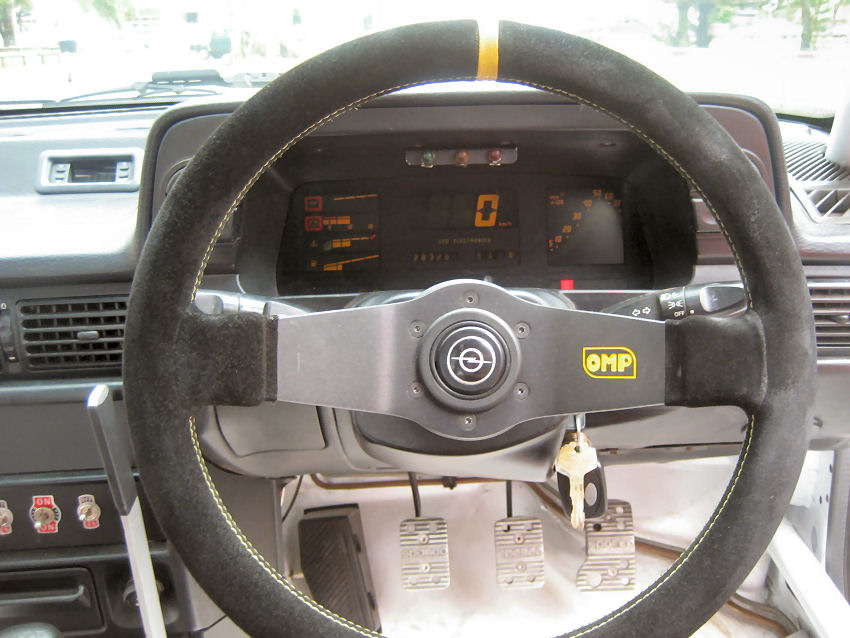
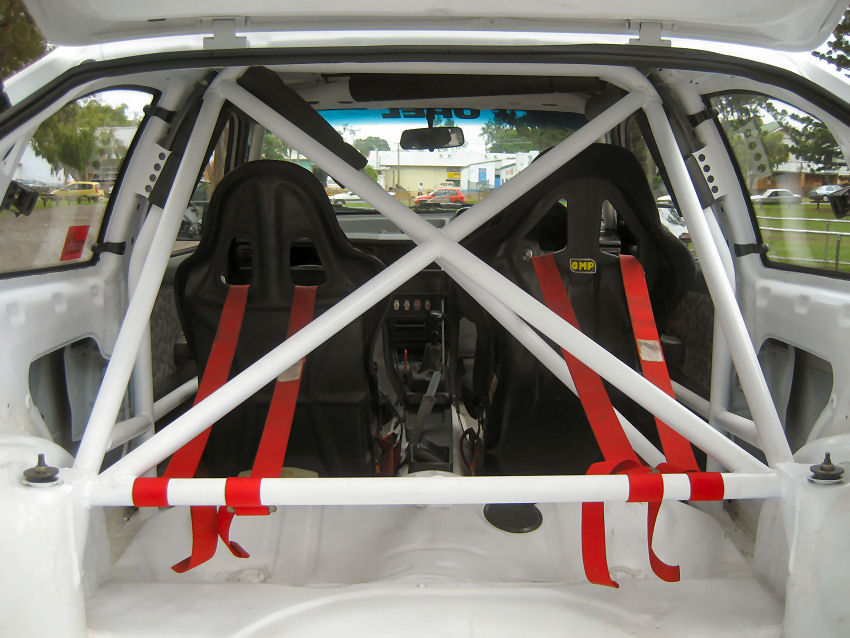
The body is a Daewoo 15i 3 door hatch. Body kit is original Vauxhall AStra GTE front and rear bumper, rear tail lights, side skirts and bonnet vents + original 1985 Digital Dash
Dirt Sprint on Willowbank (QLD Australia) Autocoss track '08.
Round 1:
Finished 3rd Class "B"
Round 2:
Finished 1st Class "B"
Fastest 2WD Car on the day
Round 3:
Finished 2nd Class "B"
2nd Outright
Current specs
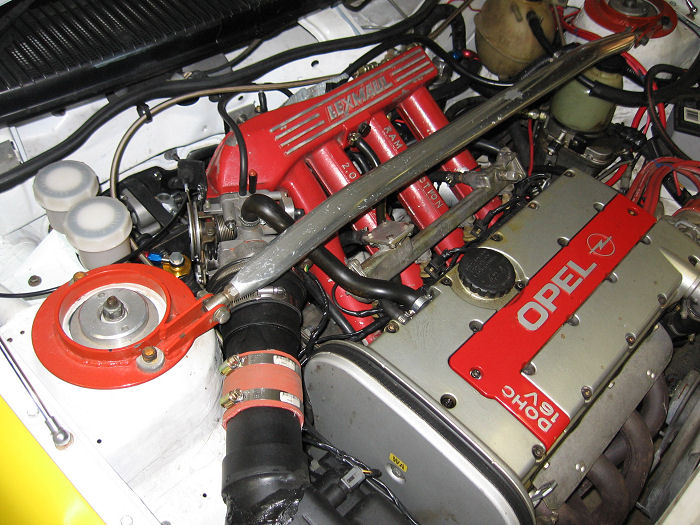
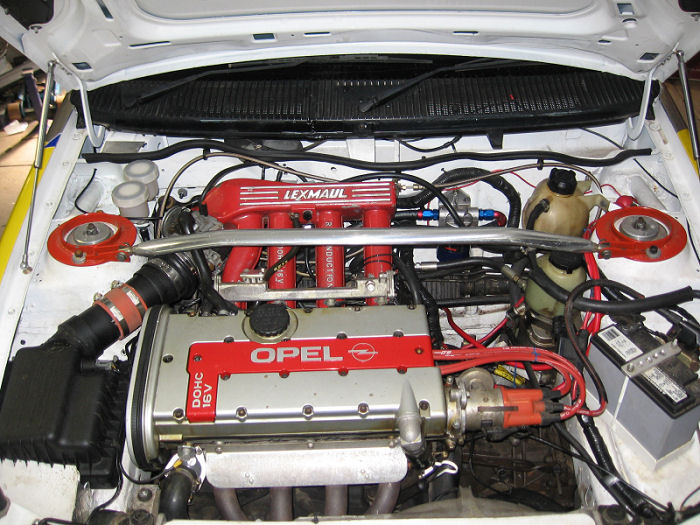
C20XE 16v Calibra engine.
Standard bottom end with ARP Conrod bolts.
Standard head and cams.
Lexmal Ram Induction Manifold
4mm oversize Throttle body
Standard Calibra Extractors
LINK Ecu G3
Aftermarket fuel rgulator
153HP at wheels
Gearbox
F16
Hewland close ratio gearset
4.8:1 Crown wheel & pinion
Quaife ATB diff
Brakes
Peugeo 405 288mm front discs with Holden Commodore Caliper single piston (pug discs redrilled)
Holden Astra 265mm rear discs single piston with hand brake
Pedal box: 0.825" Front
0.750" Rear
Balance Bar and Dash Adjuster
Hydraulic Hand Bake
Front
Front adjustable solid strut tops
Adjustable Coil-Overs Bilstein Shocks King Springs 300pound (Tarmac) 200pounds (Dirt)
Rear
Adjustable Coil-Overs Bilstien 400pound springs (aprox 200 pound at the wheel)
Electric Power Steering:
Holden Astra electric power steering pump running a Holden Camira p/s rack which is 3.3 turns lock to lock
Corner weights
Front 62%
Rear 38%
Left 49.5%
Right 50.5%
LF/RR 46.7%
RF/LR 53.3%
LF 273kgs RF 308kgs
LR 191kgs RR 165kgs
Total 945kgs
Last edited by ant0ny on Sat Jun 23, 2012 8:46 pm, edited 4 times in total.
-
- Expert
- Posts: 3772
- Joined: Wed Oct 20, 2004 4:47 am
- Location: USA, Arizona
- Contact:
Nice car mate!
How long have you been running that amount of power through that transmission? Also, how much ft.lbs does it make at the wheels?
www.KinkyMotorsports.com
04' Dropped Foreno
-Coil-overs, sway bars, 13" brakes, LSD, 235mm tires, the works
-Turbo in the works
01' Lanos Sport
-Undergoing 2.0 swap w/ lots of performance bits
http://www.cardomain.com/id/kinkyllama
04' Dropped Foreno
-Coil-overs, sway bars, 13" brakes, LSD, 235mm tires, the works
-Turbo in the works
01' Lanos Sport
-Undergoing 2.0 swap w/ lots of performance bits
http://www.cardomain.com/id/kinkyllama
I have only been running this for 3 months and done 1 event. Previous engine had 118hp @ wheels and 450 foot pounds of tractive effort (yeah I know a pain not in ft.lbs).kinkyllama wrote:Nice car mate!
How long have you been running that amount of power through that transmission? Also, how much ft.lbs does it make at the wheels?
The C20XE has 830 foot pounds of tractive effort... again sorry this is what my engine builder friends use on there dyno.
F16 is good for 190Hp at the flywheel before you get a major fail. The F20 has a larger front bearing to help take the load and thus can handle much more power. One thing I have seen poeple do wrong with using F16's and large HP is not using a spigot bearing... I wouldn't realy even run a F20 without a spigot bearing. This is the only way to make sure you don't get too much deflection on the input shaft from the motor.
I have a F20 standard box that I will transplant my Close ratio and ATB into... this will also run oil cooler and distribution pump to get better oil coverage on the gears.
I also have a F28/6 which I will hopefuly get a lower diff ratio to run for Tarmac rallys.. somewhere around the 4.4 to 4.6:1 range I was thinking but I need to do the maths.
Antony
- greenbluewoo
- Expert
- Posts: 375
- Joined: Thu Sep 23, 2004 7:44 pm
- Location: New Hampshire
- Contact:
The car is definatly a credit to you m8. Are you on the mk2 astra forum?
Apart from the interior, the door handles gives it away that it's a nexia. Was gonna say the petrol cap too but you changed it! attention to detail :Smt023.
Amazing looking car m8. Loving the colour scheme. Reminds me of the 4s only with different colours.
Cool specs too. It's rare you get someone with that amount of information on their car.
SAZ
---------------------
---------------------
Yeah I'm a member on Astra Mk2 forum.Pir0 wrote:The car is definatly a credit to you m8. Are you on the mk2 astra forum?
Apart from the interior, the door handles gives it away that it's a nexia. Was gonna say the petrol cap too but you changed it! attention to detail :Smt023.
Amazing looking car m8. Loving the colour scheme. Reminds me of the 4s only with different colours.
Cool specs too. It's rare you get someone with that amount of information on their car.
The body is as it is sold here in Australia as the Daewoo 15i... I actualy tried to get the screw on petrol cap setup from a Vauxhall/Opel Astra as it is the only real give away that it is not a 1984/85 Opel Kadett body.
Opel and Vauxhall just used the different colurs... Vauxhall was Yellow, Red and Blue and Opel as you see with the Yellow, Silver and Black.
I chose to do it Opel colours as it was the first MK2 Astra/Kadett to be homologated for rallying with the 1.8i 8v motor in 1984. This now fitting the Classic Rally Class (pre 1985) here in Australia... so i have the option to build a 18i motor for that class if I want.
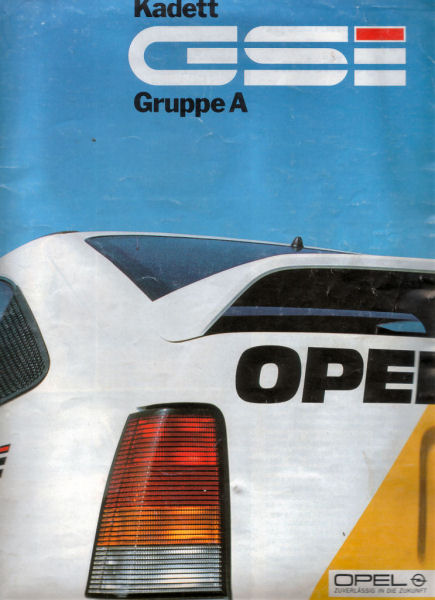
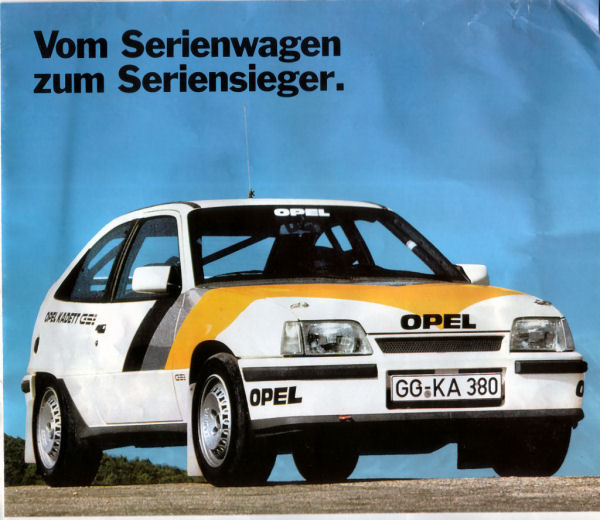
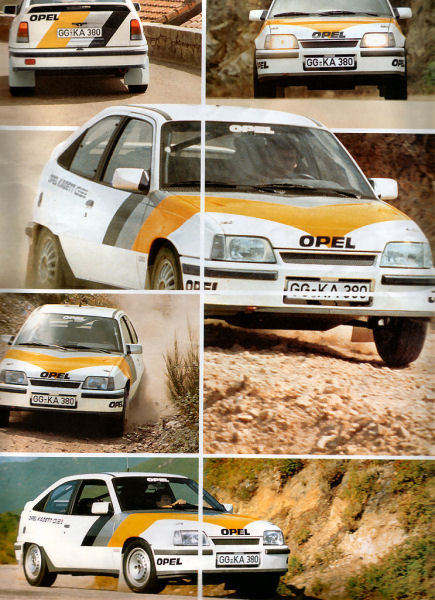
Here is part of the Original Promo for the Opel Kadett in 1985
Antony
Last edited by ant0ny on Sat Jun 23, 2012 8:46 pm, edited 1 time in total.
Re: Opel Kadett GSi Group A Rally Replica
This is a great car!ant0ny wrote:1984 Opel Kadett GSi Works Rally Cars where homoligated 1st November 1984 for Group A as a Opel Kadett-E-GSi (Homologation A-5242).
The body is a Daewoo 15i 3 door hatch. Body kit is original Vauxhall AStra GTE front and rear bumper, rear tail lights, side skirts and bonnet vents + original 1985 Digital Dash
153HP at wheels
Ahhhh, didnt know that about the opel/vauxhall using different colours. Just remember the 4s being, as you said there, red yellow and blue.
Is that the standard nexia petrol cap? In the UK none of them had a wee gap to open it with your hand, they were opened by a switch at the dashboard, or you pull a small cord in the boot and it pops open, it sits flush with the car.
Anyway, gonna say this again, 'cause I actually love your car, it's a brilliant looking car, and I wish ya the besta luck with it.
SAZ
---------------------
---------------------
- ziemniak_PL
- Posts: 77
- Joined: Tue Oct 23, 2007 1:32 pm
- Location: Whitestock, Poland
- Contact:
I ran the Opel at the 2nd round of the Dirt Sprint Series at Willowbank Autocross track (QLD, Australia) on the 22nd June.
In the First round I finished 3rd in Class B... this time I made sure I had the tyres for the day and I changed my setup for more traction.
In the first round I ran my Tarmac setup of 300lb front springs and 200lb rear (at the wheel)... this track being very smooth but compacted dirt/road base I felt I was not getting the traction.
I changed to my Rally setup with 200lb front springs and 200lb rear (at the wheel). The car was definetly better to drive.. I think even though the surface is smooth it is not tarmac smooth and I was loosing drive.
This time I put the car in First in Class B.
I was also the fastest 2WD car on the day!
This car has only done 2 events... but has already earned 2 trophies
Update:
Also I added engine pic to my specs.
Thanks mate...gse_turbo wrote:I've got to say that this car is probably my favorate of the site!
...hey I wanted to ask, what is the lever just to the left of the steering wheel?
great work, good luck on the season!
Garrett
... the leaver is a hydraulic handbrake.
Here is a link to Astra Mk2 Owners Club where I am a member... You have to be a member to view it sorry... it's worth joining anyway as it's the best site for info on the Mk2.
http://www.astra-mk2.com/forum/showthread.php?t=2014
If you decide to join there is my story of the car from the old 8v engine till now and a heap of pics of parts I have developed including the hydraulic handbrake setup.
Antony
Plenty of work over the last few weeks.
I have now fabricated the Pedalbox That had to miss my Lexmal Ram Induction manifold I bought off ebay. The manifold is off a left hand drive Calibra so couldn't use the standard brake setup thus I had to angle it down to clear the T/Body.
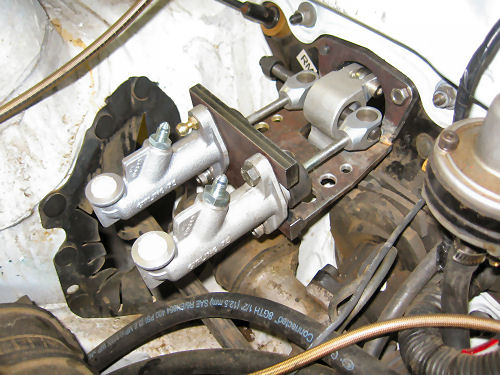
All to do will be tidying it up and painting it... then I can plumb it in and start working out the pedal balance.
Finished the Pedal Box setup. All to do is bleed the brakes and test.
On completeing the pedalbox setup and the Lexmal manifold I finished off a few other things.
The cable adjuster supplied with the ballance bar by Tim from TJM worked well (From the UK)... but I couldn't get a more direct line to the balance bar because with my radical design it was very close to the firewall... where with the normal Mk2 "off the shelf" pedalbox it is easier for more of an arc to run the cable.
So to fix my problem... and note it did work fine but I wanted a better feel and because of the tight radius I needed the cable had a "wind up" feeling to it.
I bought a Tilton 90 deg drive and this made it easier to get the sharp angle I needed.
This gave me great feel at the nob.
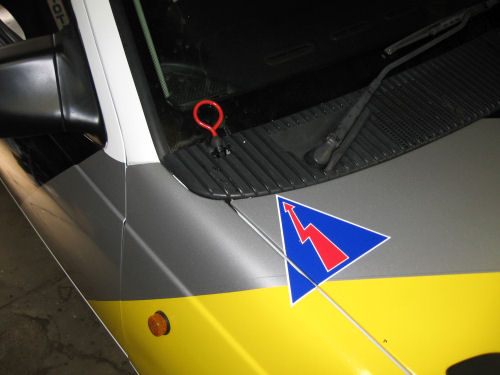
The second thing I did was setup my battery isolation switch wich as by the CAMS rules here in Australia there has to be a secondary remote switch at the "A" pilor on the outside of the car.
You can see in the Dash pic above I mounted it in the console where the open tray is under the ash tray.
people seem to wire these up buy running all the wires back into the cab or picking the main power wires out of the wiring loom.
I didn't wanty to do this so I setup a second Isolation Post with extra power connections from a Fishing and Marine Centre. Placing this in the engine bay I connected all the power wires that normaly went to the battery including the Starter/Alternator wire.
then just ran 2 heavy power cable from the isolation switch to the battery and the isolation post and it is all done.
... and here I placed the Pull cable for the battery isolation switch.
I have done a few kms on the road with the new pedal box. This I am very happy with... now to be honest my original brakes where outstanding and if it wasn't for Lexmal manifold I would most likely have not bothered with the pedalbox setup. Now it is done though i am very happy... the brake feel is fantastic and I have full adjustment from locking up the fronts to locking up the rears and all that in between.
You do have to push harder but not as hard as you think... i find it is that first pedal push you notice that there is no vacuume advantage helping you but as soon as you push that little more it all works as expected.
In the end I am running a 0.825" on the front and a 0.75" on the rear. Originaly I was using a 1" Honda Pelude master cylinder. Now this is all depending on you calipers so don't take my sizes as a starting point... find someone who has done this with similar calipers as mine are Astra Mk3 non ABS rear caliper and Holdern Comodore VL Turbo single piston caliper on the front (these are a all alloy finned caliper).
I modified the pedal ratio to 6.0:1 and may increase it a little more... but the more I increase the ratio the more movement I got before the pedal "took up"... I have noticed looking around that 6.2:1 ratio is the recomended starting point.
I am yet to go to the track and test this setup but I am confident this will work as expected.
Finished!
The manifold sounds great... has a deeper throaty sound now and although I havn't given it any stick.. it seems to pull harder down low.
I have a little work to do to get the pedal feel perfect... but I am just happy to get it together again. :Banane44:
Next: 272deg Cam shafts will be next... fitting the cams next week.
I have now fabricated the Pedalbox That had to miss my Lexmal Ram Induction manifold I bought off ebay. The manifold is off a left hand drive Calibra so couldn't use the standard brake setup thus I had to angle it down to clear the T/Body.
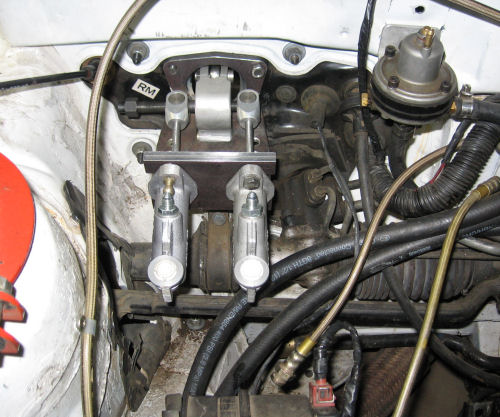
All to do will be tidying it up and painting it... then I can plumb it in and start working out the pedal balance.
Finished the Pedal Box setup. All to do is bleed the brakes and test.
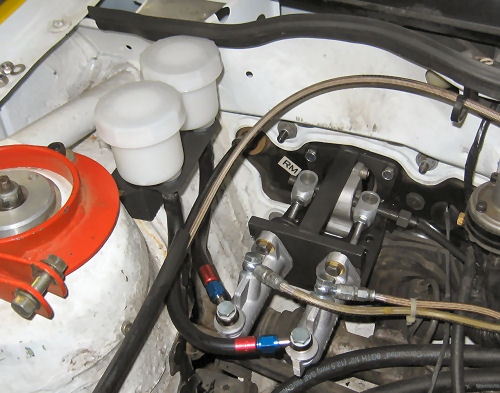
On completeing the pedalbox setup and the Lexmal manifold I finished off a few other things.
The cable adjuster supplied with the ballance bar by Tim from TJM worked well (From the UK)... but I couldn't get a more direct line to the balance bar because with my radical design it was very close to the firewall... where with the normal Mk2 "off the shelf" pedalbox it is easier for more of an arc to run the cable.
So to fix my problem... and note it did work fine but I wanted a better feel and because of the tight radius I needed the cable had a "wind up" feeling to it.
I bought a Tilton 90 deg drive and this made it easier to get the sharp angle I needed.
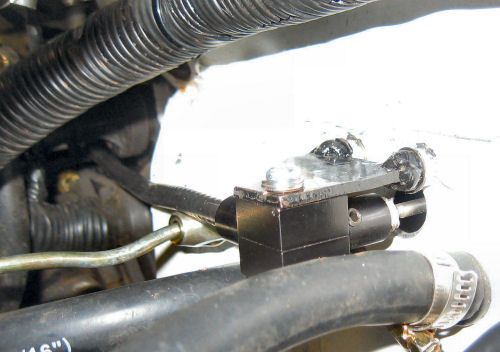
This gave me great feel at the nob.
The second thing I did was setup my battery isolation switch wich as by the CAMS rules here in Australia there has to be a secondary remote switch at the "A" pilor on the outside of the car.
You can see in the Dash pic above I mounted it in the console where the open tray is under the ash tray.
people seem to wire these up buy running all the wires back into the cab or picking the main power wires out of the wiring loom.
I didn't wanty to do this so I setup a second Isolation Post with extra power connections from a Fishing and Marine Centre. Placing this in the engine bay I connected all the power wires that normaly went to the battery including the Starter/Alternator wire.
then just ran 2 heavy power cable from the isolation switch to the battery and the isolation post and it is all done.
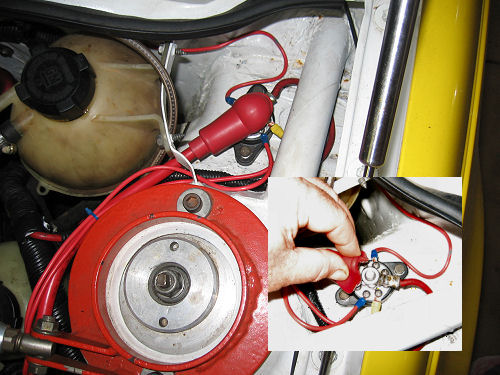
... and here I placed the Pull cable for the battery isolation switch.
I have done a few kms on the road with the new pedal box. This I am very happy with... now to be honest my original brakes where outstanding and if it wasn't for Lexmal manifold I would most likely have not bothered with the pedalbox setup. Now it is done though i am very happy... the brake feel is fantastic and I have full adjustment from locking up the fronts to locking up the rears and all that in between.
You do have to push harder but not as hard as you think... i find it is that first pedal push you notice that there is no vacuume advantage helping you but as soon as you push that little more it all works as expected.
In the end I am running a 0.825" on the front and a 0.75" on the rear. Originaly I was using a 1" Honda Pelude master cylinder. Now this is all depending on you calipers so don't take my sizes as a starting point... find someone who has done this with similar calipers as mine are Astra Mk3 non ABS rear caliper and Holdern Comodore VL Turbo single piston caliper on the front (these are a all alloy finned caliper).
I modified the pedal ratio to 6.0:1 and may increase it a little more... but the more I increase the ratio the more movement I got before the pedal "took up"... I have noticed looking around that 6.2:1 ratio is the recomended starting point.
I am yet to go to the track and test this setup but I am confident this will work as expected.
Finished!
The manifold sounds great... has a deeper throaty sound now and although I havn't given it any stick.. it seems to pull harder down low.
I have a little work to do to get the pedal feel perfect... but I am just happy to get it together again. :Banane44:
Next: 272deg Cam shafts will be next... fitting the cams next week.
Last edited by ant0ny on Sat Jun 23, 2012 8:48 pm, edited 1 time in total.