Note - this is only a guide on what i did. Please dont take this as a definitive guide since each install will be slightly different. I TAKE NO RESPONSIBILITY FOR ANYTHING THAT YOU DO TO YOUR OWN CAR. This is information on my install ONLY.
OK - so since ive now cleared myself of any responsibility
Essential Parts list
--------------------
* Part - Where to get - Notes
* Turbo - Any wrecker - Good matches for the small engines are TD04 (off Subaru, Mitsubishi) and GT28 (Nissan) with internal wastegate.
* Intercooler - Wrecker or Performance shop - lowers detonation. Size and mounting location will determine the size.
* Exhaust pipes - Any exhaust shop - either an adaptor to use the standard manifold or a full custom manifold and down pipe with flex adaptor.
* Exhaust gaskets (4) - GM Daewoo/Turbo maker - Need gasket between manifold and adaptor, adaptor and turbo, turbo and down pipe, down pipe and cat.
* Charge pipes - Exhaust shop for stainless, aluminium you need to go to an engineering shop - aluminium or stainless steel depending on what you can get.
* Various silicone joiners - Performance shop - to join charge pipes to intercooler, turbo, throttle body.
* Pod air filter - Performance shop - to filter air going into the turbo. Helps to take this to the shop making the charge pipes
* Rising Rate Fuel Pressure Regulator (RRFPR), efi fuel tube and fuel pressure gauge - Performance shop - to raise the amount of fuel when on boost. Run in series with stock regulator.
* Coolant lines - Auto store for hoses, Specialist hose maker for fittings - can use fuel tube, size depends on application, but you'll need Brass T's to tap into the coolant system too. For extra turbo cooling if available on your turbo.
* Oil Sandwich adaptor - Performance shop - to get an oil feed
* Turbo Oil feed line - Specialist hose maker - only use the best here. Teflon stainless steel braid hose atleast 1/4 inch. You can use either a T off the oil pressure switch or you can get your hose maker to rig up a christmas tree off an oil sandwich adaptor/oil cooler line.
* Turbo Oil return line - Specialist hose maker - Again go for the Teflon stainless steel braid. It's expensive but well worth the quality/safety. Go twice the size of the feed (eg. if 1/4 inch feed then use 1/2 inch return).
* Oil return fittings - Speedflow Aluminium Weld-on adaptor and Speedflow aluminium hose tail fitting - Specialist Performance shop - THESE FITTINGS MUST BE ALUMINIUM AS THE A15SMS has an alloy sump!!! They were hard to find pieces. This is for welding to the alloy oil sump for oil return and a hose tail that screws onto the adaptor. These are expensive but of AWESOME quality.
* Oil Sump Gasket Goo - GM Daewoo dealer - this is stuff insanely expensive but its the only stuff for the job and works incredibly well!!! There's no gasket.
* Check valves, vacuum tee's and vacuum tube - aquarium store - for bleeding off boost pressure on the MAP sensor feed and for connecting turbo and wastegate.
* Boost gauge - Performance shop - too measure the amount of boost you are running.
* A whole stack of various size Hose clamps.
* Change of oil (remember to use good oil designed for turbo engines - i used Valvoline Engine Armour), oil filter, sump bolt washer and coolant.
* Rocker cover breather filter - Performance shop - breather filter (or oil catch can) for rocker cover.
<EDIT 07-JAN-2006>
* 1 step Colder spark plugs (4) - Local autoparts shop - NGK V Groove BPR7E (standard are BPR6E)
* Also essential is reading as much as you can about designing, building and installing turbo systems. You can try these:
- This post
- Maximum Boost by Corky Bell (ISBN: 0-8376-0160-6)
- http://www.homemadeturbo.com
- http://www.turbosaturns.net
- http://www.honda-tech.com
</EDIT>
Optional Parts list
-------------------
* Slimline 14 inch fan - Auto store - extra clearance and cooling for the turbo. Davies Craig fans are great!
* Spare AIT sensor - GM Daewoo dealer or wrecker - so you dont stuff your original
* Spare alloy oil sump - GM Daewoo dealer or wrecker - so you dont stuff your original
* BOV - Performance shop - It's almost an essential (for me anyway). Release pressure when going from boost to vac and for the sound!!! Take to the shop making the charge pipes.
* Exhaust wrap - Performance shop - for wrapping the exhaust or oil return if you like. Extra protection!
* 2L Nubira injectors - GM Daewoo dealer - to provide more fuel. Makes the engine run a little less smooth but safer/performs better in my opinion.
Instructions
------------
You can do these steps before doing the actual turbo install:
* Boost Gauge and check valves
- Install the boost gauge - pass the feed thru a grommet in the passenger side of the vehicle, connect the tube to the intake manifold (there is one feed that is capped off - you can use this) and mount the gauge where you like - i used the A-pillar.
- On the MAP sensor feed line from the throttle body, tee in some check valves to relieve pressure. I used 3 for 6psi - works fine. They'll do nothing if the car is still naturally aspirated and bleed off boost pressure from the MAP sensor once the car is boosted.
* RRFPR - USE HOSE CLAMPS ON ALL TUBING!!!! ALL SCREW FITTINGS SHOULD USE LOCKTITE OR PROPER THREAD TAPE!
- Install the rising rate fuel regulator - Daewoo's use strange plastic clips for the hose connection the regulator and the fuel filter. You need to get a shop to make some fittings for you to use these. I changed the fuel filter at the same time so i cut the inlet and outlet off and had each welded to their own brass hose barbs (so you have 2 separate fittings) to fit EFI fuel tube. Clip the stock plastic hose into the end of the fitting and the other end, run efi fuel hose to connect to the T piece for fuel pressure gauge and from the other side of the T to the fuel filter.
- Clip the return hose off the stock regulator to the other fitting and connect the EFI fuel tube to the return of the RRFPR and the fitting.
- Connect the outlet of the stock regulator to the inlet of the RRFPR.
- Tune accordingly (i used 40psi for warm idle pressure).
These steps are for the actual turbo install in rough order to make things as painless as possible:
* Remove the exhaust pipe and install the turbo adaptor and turbo
- Remove the pipe between the exhaust manifold and the cat.
- Connect the vacuum tube between the wastegate and the charged air outlet on the turbo.
- Bolt up the adaptor to the manifold and bolt the turbo to the adaptor (You may need to remove the fans to swing the spanner properly). Use the new gaskets.
- Mark where the oil return needs to go on the sump.
* Changing sump and weld the oil return fitting
- Drain the oil from the car.
- Undo the bolts that hold the sump and remove the sump (this may require a few taps with a rubber mallet - its held tight with the gasket goo).
- If you are reusing the same sump then clean it up REALLY well and clean all the gasket goo off the sump and clean the inside of the sump well.
- Take the sump (or the new sump) and drill a hole for the oil return. Get the aluminium fitting welded to the sump. This is aluminium - so its specialised welding and not everyone can do it - make sure your shop can weld aluminium.
- Clean the bottom of the block where the sump bolts to. Scrape (without damaging the flange) all the gasket goo from the flange on the bottom of the block (make sure everything is clean inside the engine).
- Apply a generous amount of goo to the flange of the sump so it'll seal properly (without letting it run inside the sump, running outside the sump is okay).
- Wait for a few minutes till the goo goes tacky and rebolt to the block.
* Bolt up the dump pipe
- Bolt the dump pipe to the turbo and the cat (using the new gaskets).
* Oil Return - USE HOSE CLAMPS ON ALL TUBING!!!!
- Screw on the Speedflow fitting to the sump and connect the oil return tube to the turbo. This may run a little uphill but if it is twice the size of the oil feed line and it doesnt crush on itself your fine. It may run close to the dump pipe, you can lag the braided hose with exhuast wrap if you like for extra protection. MAKE SURE THEY DONT TOUCH! THEY CAN COME CLOSE BUT NOT TOUCH!!!
* Oil Sandwich and oil feed - ALL HOSES SHOULD BE PROFESSIONALLY CRIMPED!!!! ALL SCREW FITTINGS SHOULD USE LOCKTITE OR PROPER THREAD TAPE!
- Remove the oil filter.
- Connect up the Christmas tree of fittings and tubing for the oil feed to the oil sandwich adaptor (alternately you could use an oil cooler and tee off the return tube).
- Route the actual feed to the turbo (around the back of the exhust manifold, up and over the air conditioner).
- Secure the sandwich adaptor with the centre nut to the block. MAKE SURE YOU DONT DAMAGE THE O-RING! USE SEALANT TO HOLD IT IN IF YOU HAVE TO! ENSURE THE SEAL IS PERFECT!!!!
- Spin on the new oil filter and tighten.
- Fill the engine with oil.
* Remove the airbox - makes removing the coolant line easier.
- Remove the airbox.
- Unclip the AIT sensor and remove the hose between the airbox, throttle body and crankcase breather.
* Coolant lines - USE HOSE CLAMPS ON ALL TUBING!!!!
- Tee off the throttle body feed for the turbo coolant feed. You may spill some removing the stock tube.
- Return tube can be teed into the return line to the coolant reservoir.
- Top up any spilt coolant.
* Charge pipes, Intercooler, BOV and air filter - USE HOSE CLAMPS ON ALL SILICONE JOINERS!!!!
- Secure the air filter to the pipe and connect to the turbo.
- Mount the intercooler. I used two big hex head screws to the reinforcement bar behind the front bumper for a front mount.
- Dummy mount the charge pipe that connects to the throttle body with the silicone joiner connecting. In the silicone joiner, mark the spot for the AIT sensor, remove the silicone joiner and drill a hole for the sensor. Push it in so the joiner sits in the collar of the AIT sensor. It should sit flush. Seal with sealant for air tight seal.
- Mount the rest of the charge pipes.
- Secure the BOV and the trigger vacuum tube can be connected to the throttle body where the hose off the OEM breather hose is attached.
- Secure a small filter or oil catch can line for the rocker cover breather.
In Hindsight...
---------------
* Check the turbo 100% over that it'll fit perfect.
- Things are VERY tight for space so measurements are essential.
- Also check that it will fit AFTER you rotate it if you have to - i had to rotate the TD04 so make sure it fits.
- Get the turbo checked out. Replacing the seals is a nice touch on a used turbo but make sure atleast that the center cartridge is in good condition.
- Always try to keep the original fittings! It can be a painful/expensive sourcing new ones or getting them custom made.
* Don't try to rush the install at all! However long you think it'll take you to do the job having 10 minute breaks every 30 minutes - double that estimate and then add some! Its best if you dont need the car for work on Monday or something... i didnt need my car for work and it took me two weekends and 3 hours every night after work for a week - ofcourse i hadnt done anything like this before either so...
* Try to only use good quality products from brands you know/trust. It will pay off in the long run and things wont break/performance wont be hampered.
Any questions - post it up for me.
Photos
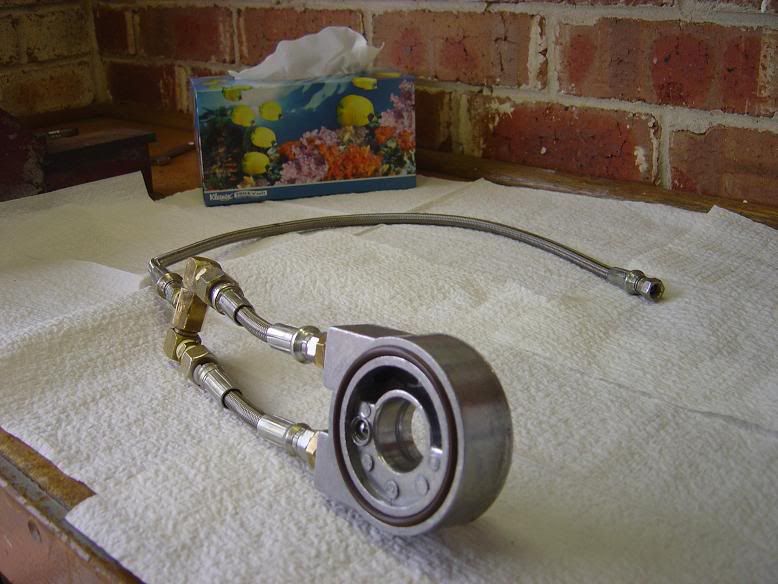
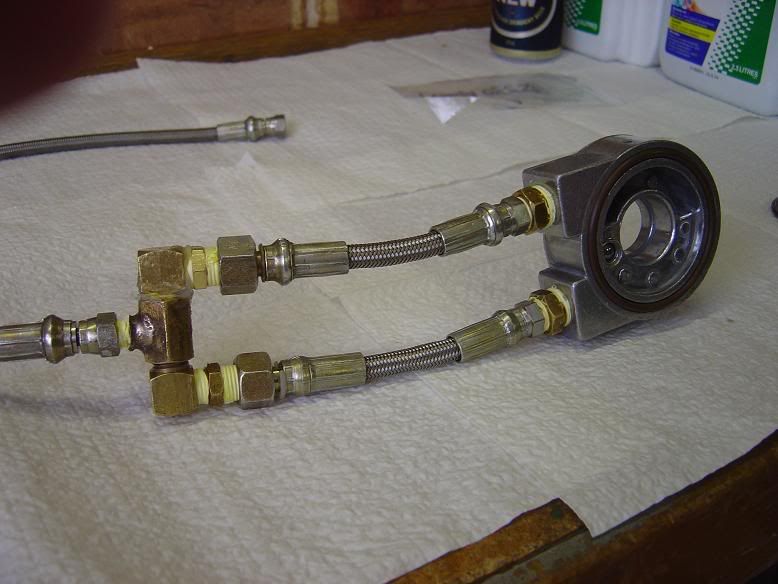
Sandwich plate+christmas tree arrangement with stainless steel braided hose for oil feed
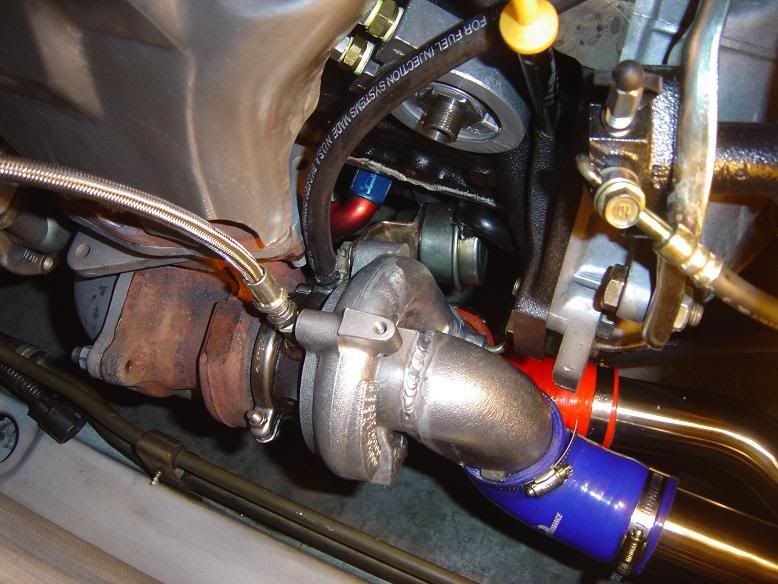
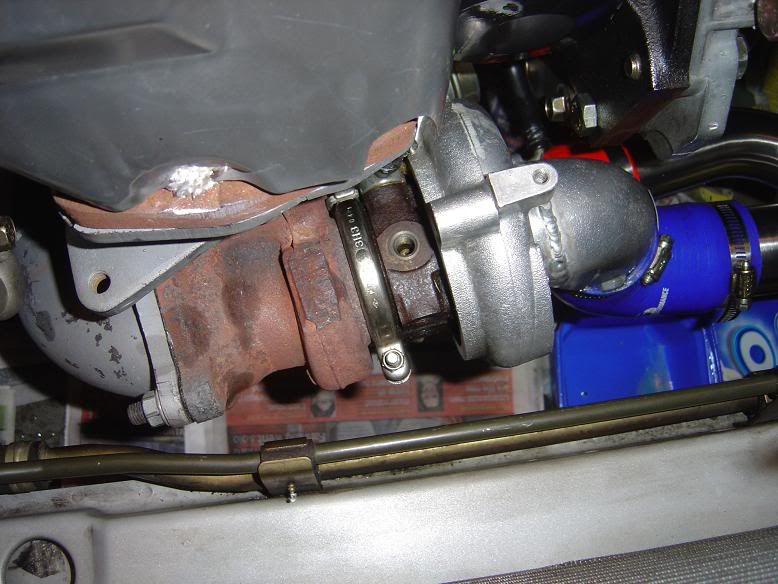
Turbo - note the sandwich plate and the blue+red speedflow fitting welded to the sump for oil return
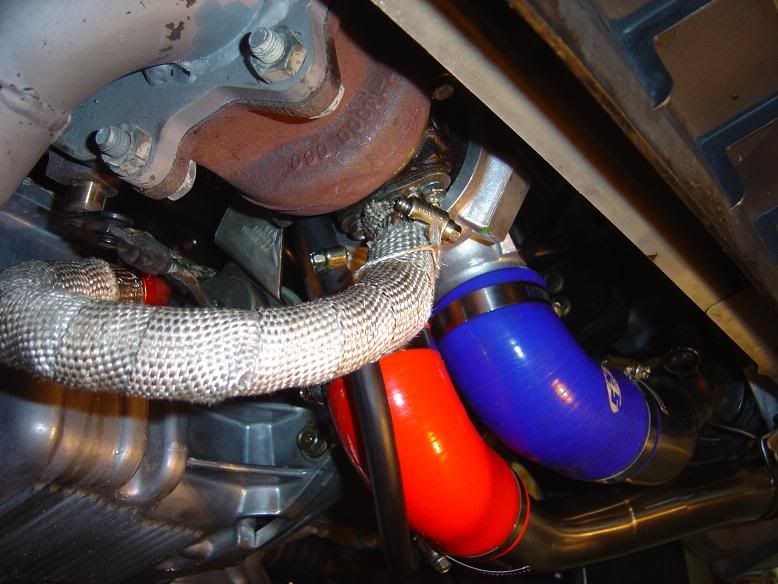
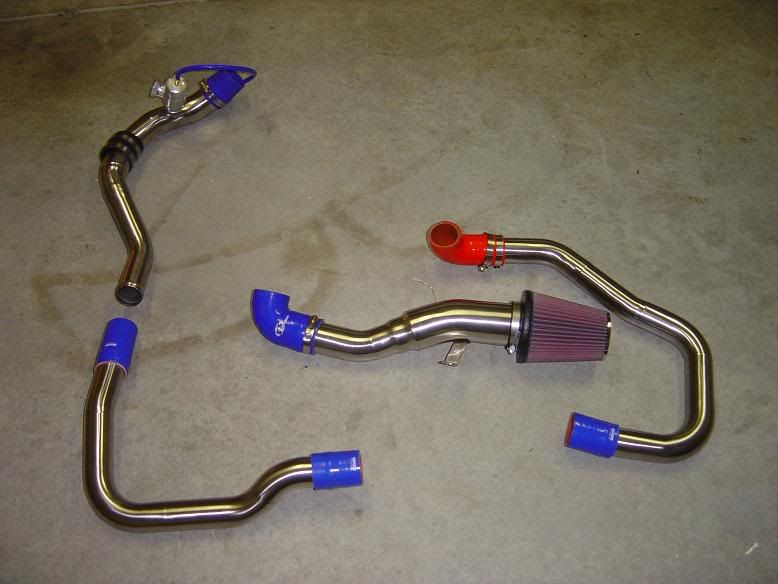
Downpipe and manifold adaptor
Charge Piping
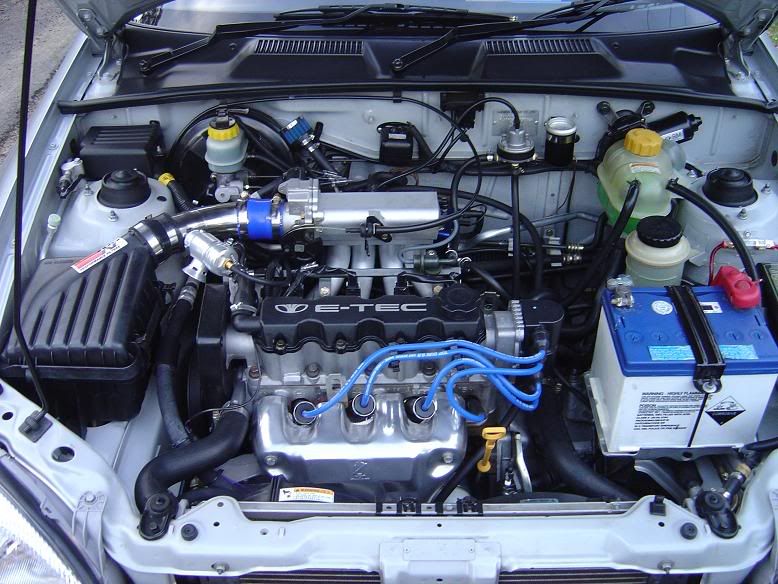
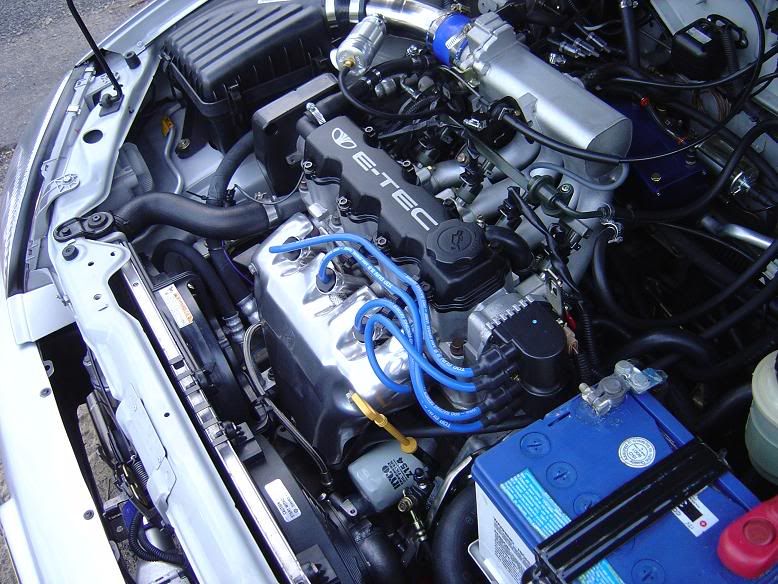
Final
--Tim